Part 4: Weekly Programming
River Oaks Church - Updated May 2025
Goals / Scope
This section will show you some of the weekly lighting process for programming.
Important Notes
There are a few notes I'd like to add before we begin:
-
Let's be clear: copying cues from week to week isn't about being lazy. It's about being effective. By leveraging existing, high-quality programming, we can dedicate our time to finessing details and creating truly impactful lighting designs.
-
My method of programming lights and screens together is to create a "theme" or "vibe" for a song that I like, and that I can reuse in the future. If the programming quality is high enough, the final product should never feel like "stale" or "recycled".
-
Part of the process of weekly programming is building upon the existing program you copied from the previous use of that song, meaning you can intentionally add or subtract from what was already there. That makes the final product even higher quality.
Prerequisite
Part 1 did cover the general process of copy and pasting the cues from previous weeks into a new cuelist. This guide will not cover that.
This guide will cover the important process of fine tuning the existing cues to match the programming required for each week.
What changes week to week?
The elephant in the room is the big question, what changes week to week?
-
Possibly the sermon series (Although, that will be covered in part 5.)
-
WHO is singing a song
-
WHERE they are singing
-
Any additional band members
-
Communion? Baptism?
-
Offering?
-
Welcome in the different spot of a service?
All of the above conditions require changes made to the cuelist.
Front Row Positions
We will first start by covering people in the front row of the stage.
Green Tape Positions
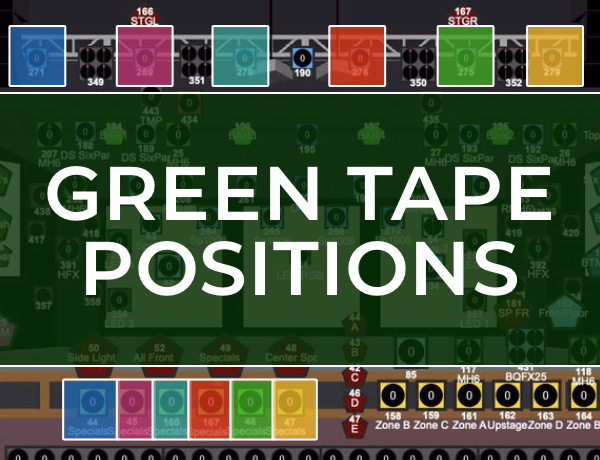
The above diagram shows the lights that cover the front "Green Tape" positions on the stage. The colors on the diagram are to show where the front lights match with the hair light.
Notes:
-
For the hair lights on the above image, I have an imaginary cap of 30% on them. Anything above 30% usually will be extremely bright on camera.
-
For the two center front lights (bottom of screen), those will match closely with the brightnesses of the "zoned" front lights we are about to cover.
-
For the 4 "outside center" front lights (bottom of screen), those have an imaginary cap of 60% brightness. I never go above 60%, but I generally run them 10-20% brighter than the zoned lights.
Red Tape Positions
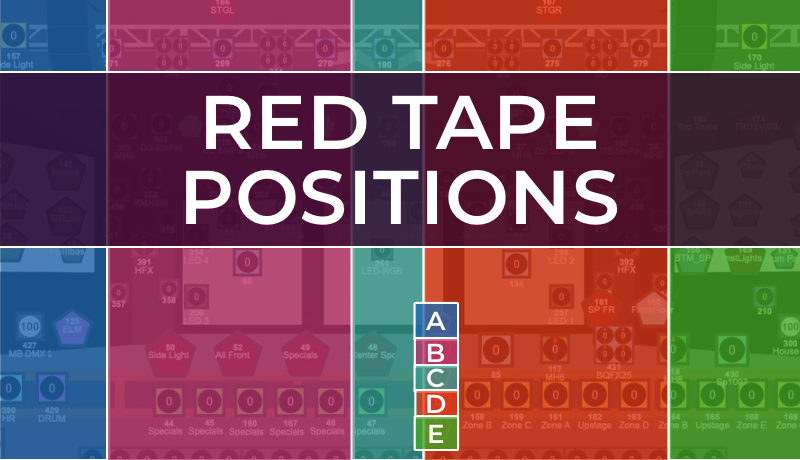
The above diagram shows the lights that cover the front "Red Tape" positions on the stage. The colors on the diagram are to show where the front light groups line up. On Vista, there are groups A, B, C, D, and E of what I call "Zoned Front lights". These are really only used when there's a large, odd number of people on stage. This is because they have a broad coverage and don't look as good on camera.
Notes:
-
Although I said the zoned front lights are only used for when there's a large and odd number of people on stage, I do use them every week as the base front light. I essentially "supplement" front light with the "specials" (green taped) lights to highlight singers or band members. These lights are typically at 10% beginning of song, 20% during first chorus, and 30% onward from second chorus to the end when I take them back to 10%.
-
There are no ideal hair lights for these positions. The nearest hair lights are the Blade QFX movers, (lights #349, 351, 350, and 352), but they aren't as wide as the Elation Six Pars, so I generally don't use them. That being said, preset #196 "QFX Hair" is the position and color I would use on them.
-
I always have these zoned lights on during the welcome, message, etc. The stage should be widely light up, not focused in on the pastor. (Except during prayer transitions:)
Back Row Positions
The next thing that could change week to week is the position of band members (or the presence of them).
When there is no Electric Guitar player, I don't light them up. No bass player? That spot is dark.
After weeks when there is violin, accordian, etc. it's important to make sure those are cleared out of the cuelist because there's no point in lighting the floor where they previously were.
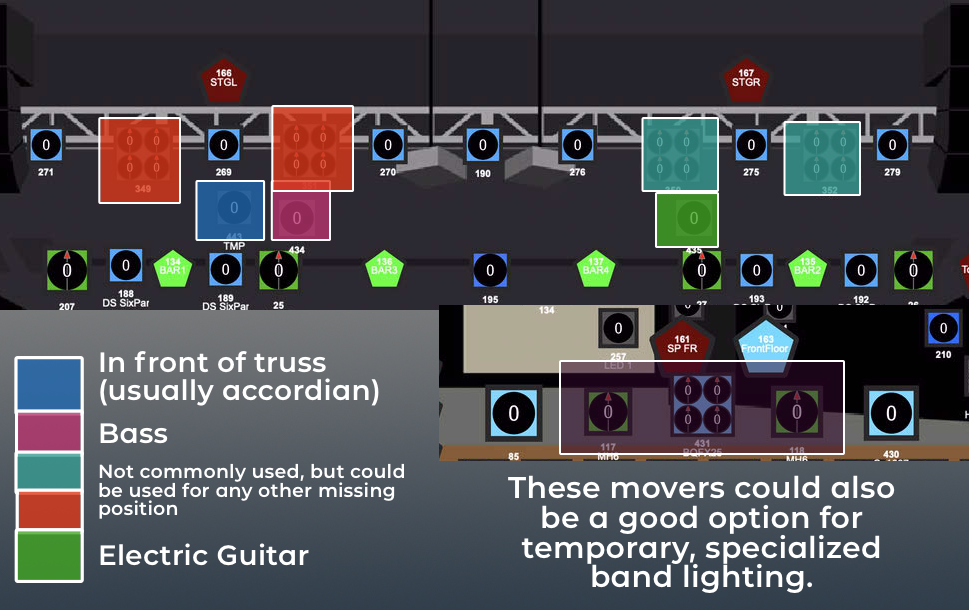
The image above should cover the different use cases of the "band lighting".
Notes:
-
Unless there is a very apparent solo of an instrument, the permenant (Bass/EG) instrument lights never will be programmed above 40%, since that usually makes them brighter than the front row.
-
The accordian light is never above 10%
-
Moving lights are usually frowned upon snice they could be pre-programmed into the cuelist for other parts of the song or service
-
The drum light is light #80 (forgot to include it in the screenshot)
Clearing Out Cue Properties
I realize this is supposed to be written documentation, but this is best described in video form.
This video will show you one of the important steps I go through weekly, of clearing out the front lights so that I can "reset" each song. This creates a blank template I can use to program off of depending on who is singing, when.
Click here to watch the video
Fixing Weird Bugs
Once again, I am going to offer a video explanation of this, since this may get a little confusing.
Click here to watch the video
Sometimes, cue properties do not carry over when you copy and paste cues. This can happen for the hazers, lamp settings on the Platinum HFX fixtures, and other fixtures. I have not taken the time to figure out why this happens, but I've added it to my weekly programming to verify the following issues don't happen:
-
Haze doesn't run pre service for the English service
-
Haze doesn't run during the message for either service
-
The bulb settings are correct throughout the service
(There are probably more scenarios but I can't remember any at this time)
To clear these properties, you just need to follow a similar step to the last topic this guide discussed.